Monday, July 27, 2009
Resource Bundle - An Alternative Way to do localization in .Net
I posted another article on code project. Trying to copy and paste it over here was so much pain because the formatting of the source codes will totally mess up. So I will just post the link over here. I have been thinking about writing this article for a long time but hadn't found a good time earlier. Without that article, LocaleManger simply doesn't make sense to .Net developers because .Net resource files are not organized the way like Java or Flex. That article shows how localization can be done with a ResourceBundle class in .Net applications, with a walk through for both a WinForm application and a WPF application.
Friday, July 24, 2009
Using Microsoft Translate API in LocaleManager
Anyway, I needed to do some translation for an application I was working on. To make this task easier, I tried to plug in some codes to do machine translation with Google Translator. It turned out to be that Google doesn't like people to call their page from an application. After I got the translation from English to Chinese done, I continued to try to get Frech, German, Russian, Spanish, Japanese, and Korean, Arabic, etc. Then it stopped working.
Before I saw some news about Microsoft's Machine Translator and always wanted to try it. It turned out to be very simple to use. Here is a link to the Translate method on MSDN. An appID is required and here is the link to apply for an appID. I used the HTTP API in my application. For more details about other translator API, the Translator Hands on Lab is a good place to get information.
I was getting 302 in service capture. Even when I went to browser to translate.google.com, I was redirected to some other page saying that Google suspect that there is some virus attack going on. It seems like Google only supports AJAX API for its translator, meaning that you can use it on webpages to let user to translate the page. But they don't want people to keep on request their page through an application. (That's interesting. I remeber when I was trying different load testing tools, I tried to use the tool to go to Google first to make a sample Load test.) I am not sure for how long Google block my IP. At least after the weekend, everything went back to normal.
Before I saw some news about Microsoft's Machine Translator and always wanted to try it. It turned out to be very simple to use. Here is a link to the Translate method on MSDN. An appID is required and here is the link to apply for an appID. I used the HTTP API in my application. For more details about other translator API, the Translator Hands on Lab is a good place to get information.
The Terms of Services for using the API are not very clear though. It seems like it is okay to use it in an application, however Microsoft reserves the right to start charging an app developer depending on the usage of their service. It is not clear like the Maps API's terms of services: Unlimited use. Use it in anyway you want.
But anyway, localManager now has the capabilities to do translation. It actually works pretty well. Human proof reading and editing is necessary of course with the machine translated text, but most of the translation is usable. At least it saves a lot of time and energy. From the Chinese translation I went through, I have to say that Microsoft Translator's overall quality is better than Google's. Microsoft's Translator can rearrage a phrase when needed pretty well. I was surprised with some translation they did for Chinese.
I want to take another look at the Terms and Services first and then I can push my new version of localeManager with translation capabilities.
Sunday, March 8, 2009
Locale Manager (4) - Dynamically Add Columns/Rows to a DataGrid
For other parts, please click the following links:
Part 1 - Introduction of Locale Manager
Part 2 - How to: Use Locale Manager
Part 3 - Example of Using DirectoryInfo and FolderBrowserDialog
III. Dynamically Add Columns to a DataGrid
If the datagrid you want to display always has the same number of columns and the headers remain the same, you can just configure the datagrid through property settings. However, sometimes the number of columns and headings depends on user's input, we need to dynamically add columns to the datagrid.
The following codes show how colomns are added to the Datagrid on Worksheet form based on which target locales user selects. Column index comes from enumeration of columns:
private void WorkSheetForm_Load(object sender, EventArgs e)
{
FileInfo[] files = Global.BaseDir.GetFiles("*"+ Global.Extension);
...
...
//determine number of columns for the datagrid
m_grid.ColumnCount = Global.Locales.Length + (int)Columns.Base + 1;
_numOfCols = m_grid.ColumnCount;
m_grid.Columns[(int)Columns.No].Name = "no.";
m_grid.Columns[(int)Columns.No].ValueType = typeof(int);
m_grid.Columns[(int)Columns.File].Name = "file";
m_grid.Columns[(int)Columns.Name].Name = "name";
m_grid.Columns[(int)Columns.Base].Name = Global.BaseDir.Name;
int i = (int)Columns.Base + 1;
foreach (string locale in Global.Locales)
m_grid.Columns[i++].Name = locale;
...
}
When the column "no." is added, I set its ValueType to int, otherwise it is going to be string by default. This matters when user clicks the header to do a sort. If the value type is string, the sorted result will be "1, 11, 2, 21, ..." instead of "1, 2, 3, ...".
m_grid.Columns[(int)Columns.No].Name = "no.";
m_grid.Columns[(int)Columns.No].ValueType = typeof(int);
IV. Dyanmically Add Rows to the Datagrid
The function AddRowToGrid() shows how to add a new row to the datagrid. The function AddToRow() shows how to fill out cells or access cell values in an existing row.
private void AddRowToGrid(string file, int i, string name, string value)
{
string[] row;
row = new string[_numOfCols];
row[(int)Columns.No] = i.ToString();
row[(int)Columns.File] = file;
row[(int)Columns.Name] = name.Trim();
row[(int)Columns.Base] = value.Trim();
m_grid.Rows.Add(row);
}
private void AddToRow(int i, int localeIndex, string value)
{
if (null!= value && i>=0)
m_grid.Rows[i].Cells[getColumnNo(localeIndex)].Value = value;
}
private int getColumnNo(int localeIndex)
{
return (int)Columns.Base + localeIndex + 1;
}
Part 1 - Introduction of Locale Manager
Part 2 - How to: Use Locale Manager
Part 3 - Example of Using DirectoryInfo and FolderBrowserDialog
III. Dynamically Add Columns to a DataGrid
If the datagrid you want to display always has the same number of columns and the headers remain the same, you can just configure the datagrid through property settings. However, sometimes the number of columns and headings depends on user's input, we need to dynamically add columns to the datagrid.
The following codes show how colomns are added to the Datagrid on Worksheet form based on which target locales user selects. Column index comes from enumeration of columns:
public enum Columns
{
No = 0, File, Name, Base
};
private void WorkSheetForm_Load(object sender, EventArgs e)
{
FileInfo[] files = Global.BaseDir.GetFiles("*"+ Global.Extension);
...
...
//determine number of columns for the datagrid
m_grid.ColumnCount = Global.Locales.Length + (int)Columns.Base + 1;
_numOfCols = m_grid.ColumnCount;
m_grid.Columns[(int)Columns.No].Name = "no.";
m_grid.Columns[(int)Columns.No].ValueType = typeof(int);
m_grid.Columns[(int)Columns.File].Name = "file";
m_grid.Columns[(int)Columns.Name].Name = "name";
m_grid.Columns[(int)Columns.Base].Name = Global.BaseDir.Name;
int i = (int)Columns.Base + 1;
foreach (string locale in Global.Locales)
m_grid.Columns[i++].Name = locale;
...
}
When the column "no." is added, I set its ValueType to int, otherwise it is going to be string by default. This matters when user clicks the header to do a sort. If the value type is string, the sorted result will be "1, 11, 2, 21, ..." instead of "1, 2, 3, ...".
m_grid.Columns[(int)Columns.No].Name = "no.";
m_grid.Columns[(int)Columns.No].ValueType = typeof(int);
IV. Dyanmically Add Rows to the Datagrid
The function AddRowToGrid() shows how to add a new row to the datagrid. The function AddToRow() shows how to fill out cells or access cell values in an existing row.
private void AddRowToGrid(string file, int i, string name, string value)
{
string[] row;
row = new string[_numOfCols];
row[(int)Columns.No] = i.ToString();
row[(int)Columns.File] = file;
row[(int)Columns.Name] = name.Trim();
row[(int)Columns.Base] = value.Trim();
m_grid.Rows.Add(row);
}
private void AddToRow(int i, int localeIndex, string value)
{
if (null!= value && i>=0)
m_grid.Rows[i].Cells[getColumnNo(localeIndex)].Value = value;
}
private int getColumnNo(int localeIndex)
{
return (int)Columns.Base + localeIndex + 1;
}
Locale Manager (3) - Example of Using DirectoryInfo, FolderBrowserDialog and Sharing Data between Different Forms
For part 1 and part 2, please click the following links:
Part 1 - Introduction of Locale Manager
Part 2 - How to: Use Locale Manager
I. Program Structure - using Model to store data
There are two forms in the code:
This program uses the MVC (Model-View-Controller) pattern to pass data around the UI. Application data is stored in Global.cs, the Model. So, MainForm.cs passes data such as BaseDir, RootDir, and Locales to Global.cs, and WorkSheetForm.cs can go pick it up over there.
II. Using DirectoryInfo, FolderBrowserDialog
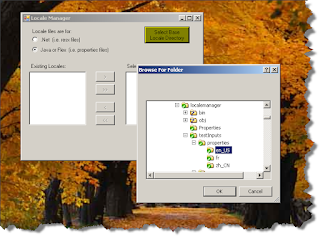
FolderBrowserDialog is used instead of a OpenFileDialog so that only folders are shown while user tries to find the base locale directory.
.Net's DirectoryInfo class is very handy and you can retrieve all different info about a directory or a file. The MainForm.cs uses this class to get the base directory and the root locale directory. The
Part 1 - Introduction of Locale Manager
Part 2 - How to: Use Locale Manager
I. Program Structure - using Model to store data
There are two forms in the code:
MainForm and WorkSheetForm. MainForm is the one to ask the user to select the base locale directory by file browsing. Then, it displays all the sibling subdirectories of the base directory.WorkSheetForm will show after the user selects one or more target locales and clicks the Load button. The program will dynamically add columns to the DataGrid depending on how many locales are selected.This program uses the MVC (Model-View-Controller) pattern to pass data around the UI. Application data is stored in Global.cs, the Model. So, MainForm.cs passes data such as BaseDir, RootDir, and Locales to Global.cs, and WorkSheetForm.cs can go pick it up over there.
II. Using DirectoryInfo, FolderBrowserDialog
FolderBrowserDialog is used instead of a OpenFileDialog so that only folders are shown while user tries to find the base locale directory.
.Net's DirectoryInfo class is very handy and you can retrieve all different info about a directory or a file. The MainForm.cs uses this class to get the base directory and the root locale directory. The
fillLocaleList() function finds all the sibling subdirectories and add them to the list box.The codes will enable buttons only when a user finishes the required steps first. This is very easy to do but will help the user a lot and make the application friendly.private void m_browse_Click(object sender, EventArgs e) { m_baseDirBrowserDlg.SelectedPath = Environment.CurrentDirectory; if (m_baseDirBrowserDlg.ShowDialog(this) != DialogResult.OK) return; Global.BaseDir = new DirectoryInfo(m_baseDirBrowserDlg.SelectedPath); Global.RootDir = Global.BaseDir.Parent; m_baseLocale.Text = Global.BaseDir.Name; fillLocaleList(); } private void fillLocaleList() { m_allLocales.Items.Clear(); m_selectedLocale.Items.Clear(); DirectoryInfo[] subs = Global.RootDir.GetDirectories(); foreach (DirectoryInfo sub in subs) { String dirName = sub.Name; //exclude base locale dir in the list if (dirName != Global.BaseDir.Name) m_allLocales.Items.Add(dirName); } if (m_allLocales.Items.Count > 0) { m_add.Enabled = true; m_addAll.Enabled = true; m_allLocales.SelectedIndex = 0; } else MessageBox.Show("No sibling folders were found for the base locale."); }
Wednesday, March 4, 2009
How to: Use LocaleManager
(For Part I, Introduction of LocaleManager, click here.)
It is very easy to use the locale manager. It is a standalone application that runs on window.
It is very easy to use the locale manager. It is a standalone application that runs on window.
The executable and some test input files can be downloaded from
Github
Github
To use it, just follow the screen captures.
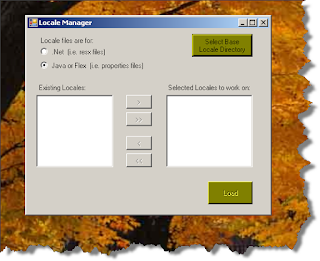
1. Start the program. Then select base locale directory, e.g. en_us.


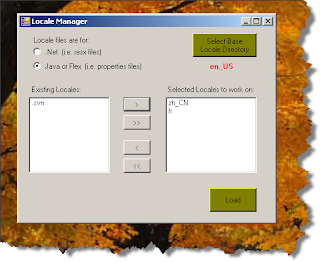
2. After clicking ok, the base locale name will be shown in red color on the dialog. Also the sibling sub-directories will be displayed in the list box on the left as existing locale. For anybody using subversion, the svn directory also showed up and that shouldn't be selected as a target locale.


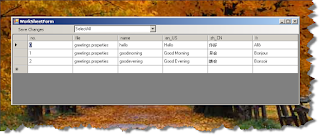
3. After selecting locales to work on, click Load and the worksheet will show as follows. My test input files only have 3 lines so it doesn't look impressive. This window is resizable. This worksheet form shows the resource name, its value in base locale and values in selected locales. It is very easy to see which ones are not translated yet.
The target locale file will be reorganized to use the same resource entries as in base. Any entries that exist in base but not in target will be added to the target locale with a blank value. Any entries that exist in target but not in base will be taken out and save to a Mismatch_timestamp.log located in the same folder as the .exe file.
Click Save Changes before close the window and changes made will be saved to target file. Base file will not be touched.

A new feature I just added is the Translate function. You can simply double click on an item under a target locale column, that item will be translated. A message box will pop up to ask you if you want to use that translation to replace the existing one.
The default translator is Microsoft Translator. Not all languages are supported by Microsoft right now. So you can use the menu to select Google Translator to see if your language is supported. I checked a few languages to make sure that the request will get some good response. Such as for Chinese, the parameter I pass to Microsoft Translator is "zh-CHS", but for Google, I need to use "zh_cn". So if you don't get any result from either of the translator, you can try to tweak the request by simply rename your locale folder, whose name is used by LocaleManager to send request to Microsoft or Google.
When you want all items to be translated, click on Translate All on the menu bar, the software will try to send a translate request to Microsoft or Google to translate "Hello World". So take a look at the returned result first. If the result is good, that means all the parameters and your internet connection is working well. If the result is not good or some errors returned, click "No" on the MessageBox to cancel the translation. Click "Yes" will only be a waste of time.
When you have many items to translate, the UI may appear to be frozen. But just leave it like that. It is going to come back when it is done. When I get some time, I can try to add more codes to make the UI more responsive.
WebORB Rocks!
The situation that leads us into using WebORB is that we use C# and SQL server on the server side with Flex on client side. The communication has been through SOAP. The SOAP packages can be really bulky sometimes. Performance was not extremely bad but we are looking for better.
WebORB allows our server and clients to communicate through remote objects. I have been running load testing when we were using SOAP. After we put WebORB in place, I ran load testng again and the performance improvement was huge. Parsing XML does take time. No doubt about it.
WebORB allows our server and clients to communicate through remote objects. I have been running load testing when we were using SOAP. After we put WebORB in place, I ran load testng again and the performance improvement was huge. Parsing XML does take time. No doubt about it.
LocaleManager - a practical tool to manage resources files of different locales for Flex and .NET
A problem I have been facing recently during Flex development is that the en_US base locale files change from time to time as new strings are added to codes and it is hard to keep the files for other locales in sync. I couldn't find any simple and free tool like this on the web so I decided to develop it by myself.
This app allows a user to select a base locale and any other locale or locales to work on. Then it displays the name and value of resources in a table. Users can keep track of which entries need to be translated or simply work on this table to fill all the blanks. The changes will be saved with UTF8 encoding.
It supports two types for resource files:
This tool can be downloaded from Github.
It is a C# implementation. The sources for the initial version are also available on Google, but later I started using my own svn and the codes on Google are far from the latest.
Here is the link on How to use the tool.
Or see the post on CodeProject.
This app allows a user to select a base locale and any other locale or locales to work on. Then it displays the name and value of resources in a table. Users can keep track of which entries need to be translated or simply work on this table to fill all the blanks. The changes will be saved with UTF8 encoding.
It supports two types for resource files:
- .properties files for Java or Flex
- .resx files for .Net
locale-
--- en_US - resource files in English
--- de - resource files in German
--- fr - resource files in French
For .Net Developers, you can refer to my article about ResourceBundle to see how it is possible to organize resource files this way for .Net applications including WPF applications.
This tool can be downloaded from Github.
It is a C# implementation. The sources for the initial version are also available on Google, but later I started using my own svn and the codes on Google are far from the latest.
Here is the link on How to use the tool.
Or see the post on CodeProject.
NUnit versus Visual Studio 2008's Test Project for Unit Testing on C# codes
I've seen people asking about which unit test tool to use and would like to talk about my experience with NUnit and Visual Studio 2008.I started unit testing with NUnit and loved it and the idea of unit testing. The good things about it are:
It is easy to get started.
It has a very good user interface, simple but elegant. It shows everything you will want to see from unit test results.
It runs fast.
Tests can be run from inside Visual Studio so you can debug the codes if needed. I know it can plug into Visual Studio but never tried that. The way I use it is to set my unit test project's Start Up application as NUnit.exe in the project's debug configuration.
Tests can also be run by using NUnit's UI only if you want to see some quick results.When I started using Visual Studio 2008, I noticed that in the Add an item menu, there is an option to add a Unit Test. I started to try it. At the beginning, I still prefer NUnit. But now I would recommend people to use Visual Studio 2008's unit test for the following reasons:
VS's unit test codes can be generated automatically. This saves a lot of typing. It's not a big deal though if you want to organize the codes in your own way. But it is a very powerful and impressive feature.
VS's unit test allows you to test private functions. This is something I wished NUnit would have when I was using NUnit. There are simply some important private functions that need to be covered with Unit Test. I don't want to change them to public in order to test them.
The most compelling reason that I want to stick with VS unit test is that these tests can by used by Team System's load test directly. I recently started working on load testing with Team System. It is very powerful load testing tool. It can be created by selecting unit tests or web tests. If the codes being tested are for a server and load is a concern, it is better to create VS unit tests so they can be used for load tests later.It is possible to use both though by using some conditional compiling settings. But I feel it will be easier to deal with one tool only.
Subscribe to:
Posts (Atom)